codetour
You are viewing the documentation for a project that has not been released publically!
Some pages may be incomplete or incorrect, and links may be broken. I plan to release this as soon as possible, but also need to do a few more things (like write the rest of this documentation) before I can do that. Hopefully I will have more time to work on this soon. Thanks for your patience!
Codetour is a documentation tool for walking through the creation of multi-file projects and showing their development step-by-step. The tool is written in Rust, but is designed to be useful for showing the progression of any project written in any language(s).
Running the tool generates a static website that looks something like this:
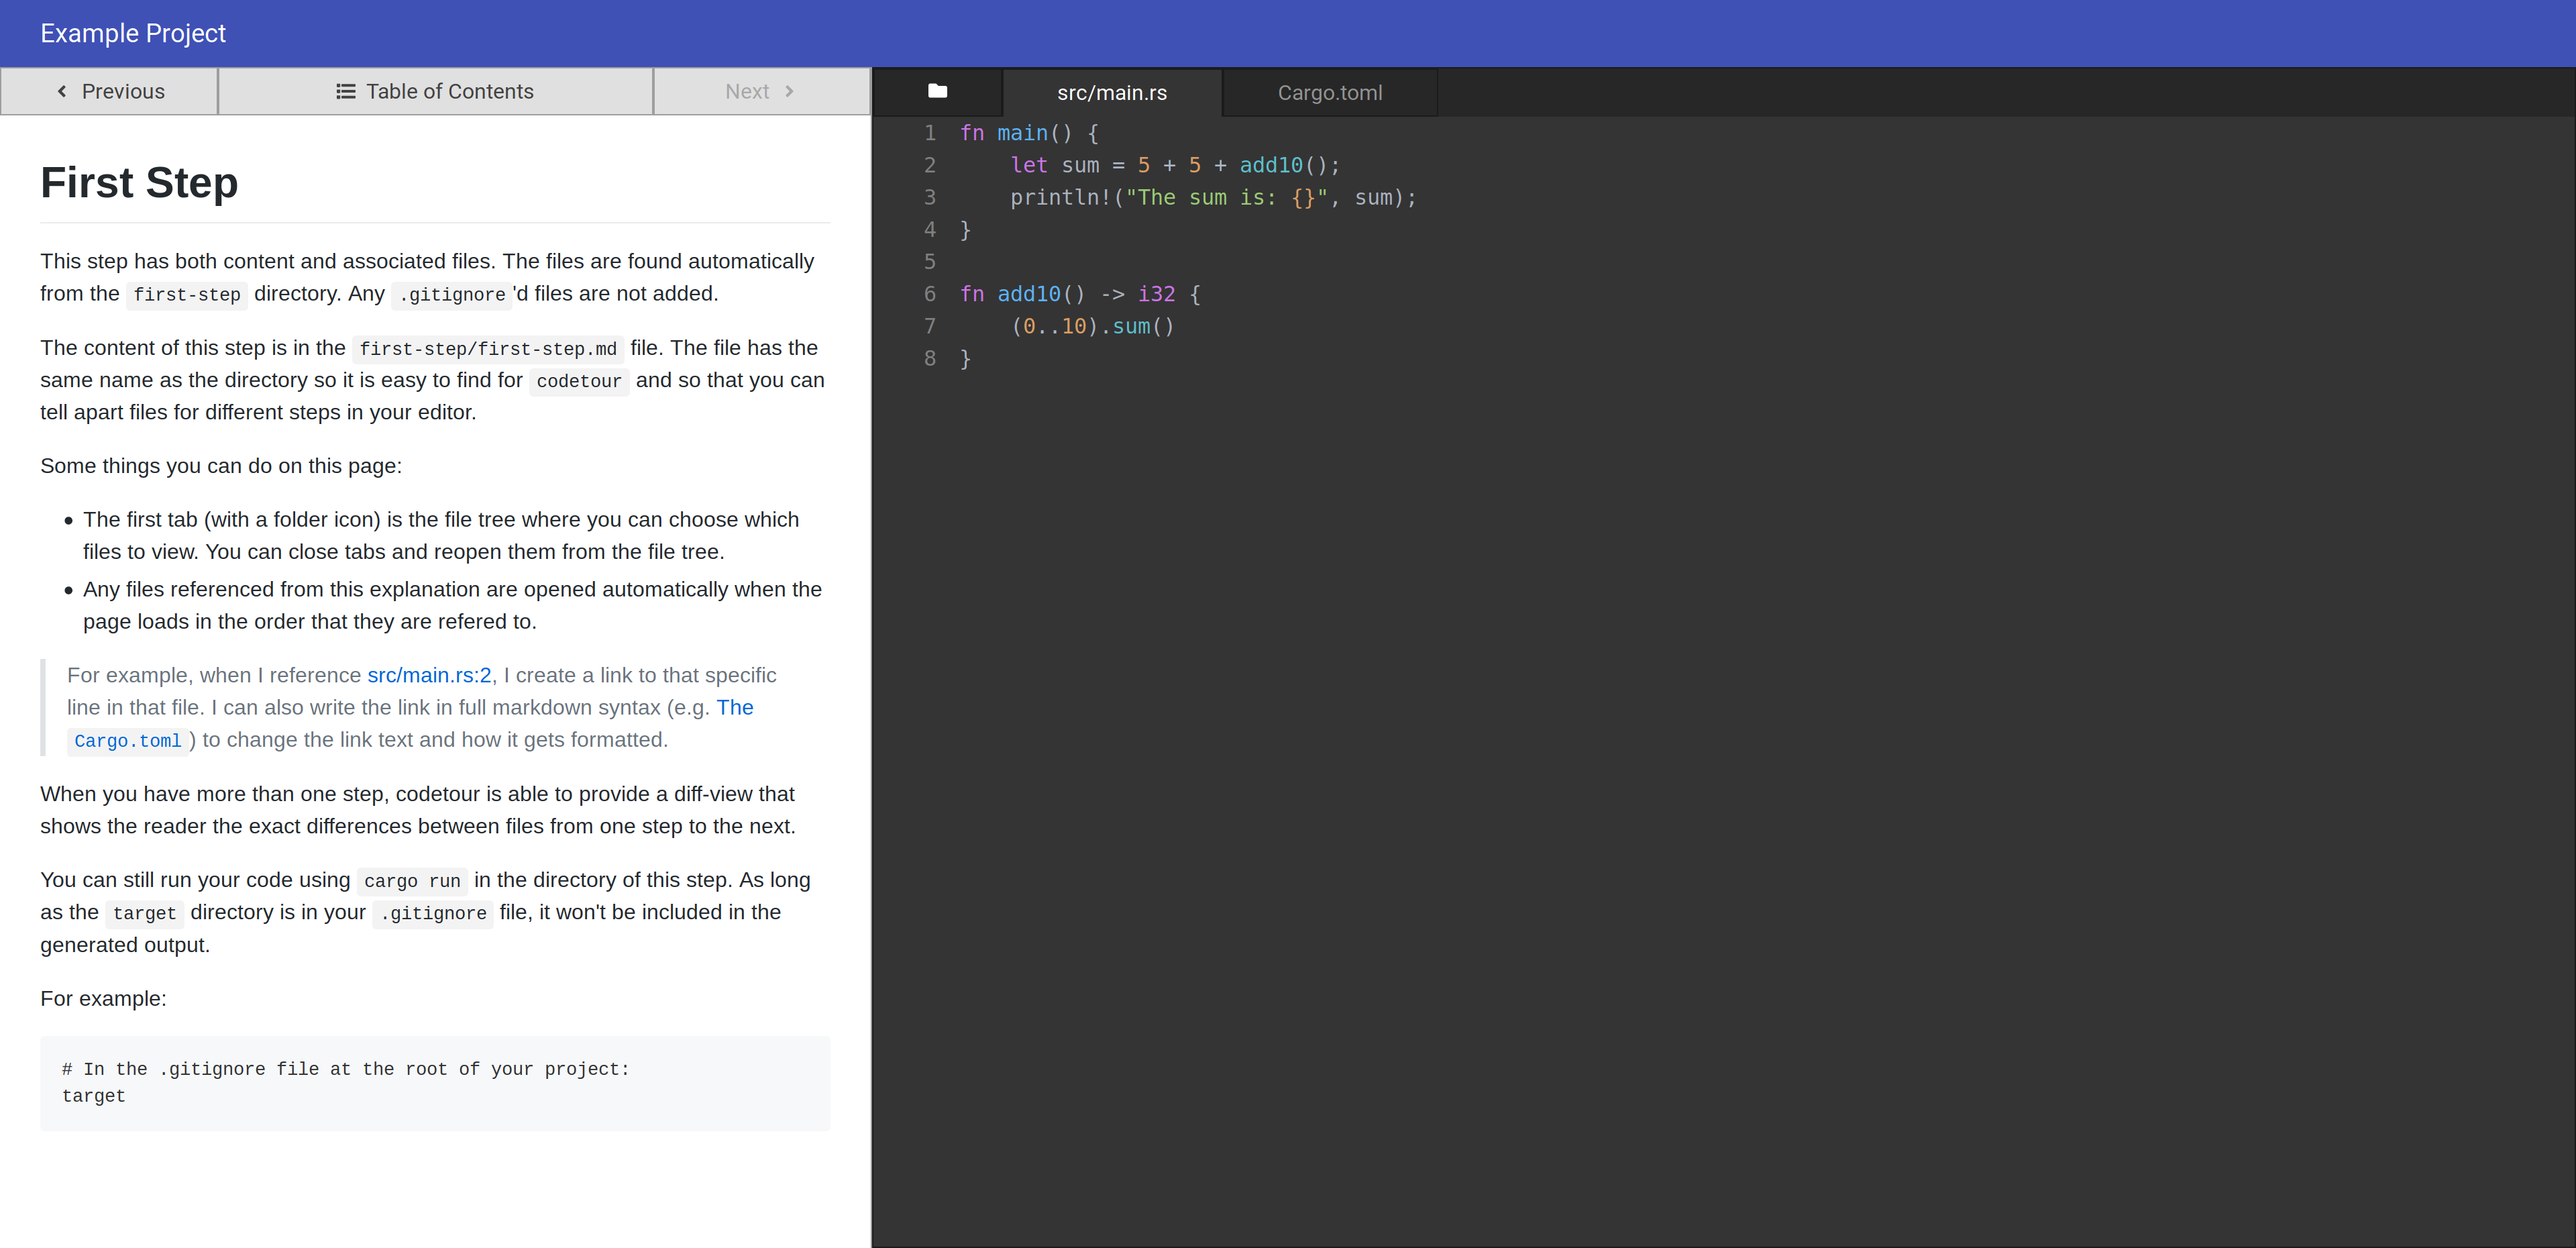
Other related tools (e.g. mdBook) are great for writing books, tutorials, and even documentation, but don't necessarily suit the same purpose as codetour. Following the development of a full, multi-file project can be hard to do when the code snippets are inline with the rest of the explanation. Instead, in codetour, the code and the explanation are side-by-side. The reader is no longer expected to put together how the project should look on their own. We present everything exactly how they might see it in their own code editor.
This is a tool for teaching people how to author full projects that go beyond the small example programs we're used to learning about. I hope you're able to use it to share your favorite projects and help people learn to make them themselves!
-- Sunjay Varma (The author of codetour, documentation enthusiast)
Getting Started
Continue to Installation to learn how to install codetour on your computer and get started.
The rest of this documentation covers the many features of codetour. It's easy to get started with the tool and there are lots of neat features for you to try out! This software has been designed with care and we hope it enables you to clearly show people how to create amazing projects!
Browser Support
The website generated by codetour is designed specifically for certain web browsers. Limiting the browsers we support helps us keep codetour maintainable and also allows the generated website to be smaller in size. It also simplifies testing and reduces the amount of work required to ensure that a feature works correctly.
For detailed information about which browsers we support, please see the Browser Support section in the GitHub repository.
License
The codetour tool and all its source code is released under the Mozilla Public License v2.0.
Acknowledgements
Many parts of this tool have been inspired by mdBook, rustup, cargo, and other incredible tools written in Rust and other languages. This documentation for example, is largely written in the same format as mdBook. While that may change over time, we are very grateful for the community that built those tools and created that excellent documentation.
Installation
The codetour command line tool is called ct.
Install from binaries
Coming soon! See #54 for more information.
Precompiled binaries are provided for major platforms on a best-effort basis. Visit the releases page to download the appropriate version for your platform.
Install from source
The codetour tool can also be installed from its source code.
Codetour is written in Rust and therefore needs to be compiled with Cargo. If you haven't already installed Rust, please install it now.
Install crates.io version
Once you have Rust and Cargo, installing codetour is relatively easy.
Run the following command:
cargo install codetour
This will fetch the source code for the latest release from crates.io and
compile it. You will have to have Cargo's bin directory to your PATH.
Run ct help in your terminal to verify if it works. Congratulations, you have
installed codetour!
Add the --force flag to this command to update your installation to the latest
release.
Install git version
The git version contains all the latest bug-fixes and features that will be released in the next version on crates.io. If you can't wait until the next release, you can build the git version yourself. Open your terminal and navigate to the directory of you choice. We need to clone the git repository and then build it with Cargo.
git clone --depth=1 https://github.com/sunjay/codetour.git
cd codetour
cargo build --release
The executable ct will be in the ./target/release folder, this should be
added to your PATH.
Getting Started
Once you have codetour installed, you can start a new project with the new command or build an existing project with the build command. See their respective documentation for more information.
The remaining sections of this documentation go through other supported commands as well as the many features of codetour.
Command Line Tool
The codetour command line tool is called ct.
Just running ct alone is the same as running ct build without any arguments.
See the build command for more information.
--help
When you use the --help (-h) flag, codetour will show a description of the
command, flags that it supports, and its subcommands. After printing that
information, the program will immediately exit.
Every subcommand also supports a --help (-h) flag for showing the specific
help information for that subcommand. This flag is fairly common in most
command-line applications, so we do not document it on the page for every
subcommand.
You can also use ct help <subcommands>... to seek information about a specific
ct subcommand.
--version
When you use the --version (-V) flag, codetour will print the name of the
application, followed by the current version installed on your computer.
This is a great piece of information to provide in bug reports so we know what version of codetour you are using.
Run in any subdirectory
The ct command and any of its subcommands can be run in any subdirectory of
your project. As long as a tour.toml file is in one of the parent directories,
the project will be detected automatically. The command will be run as if you
ran it in the directory of that configuration file.
Subcommands
Each of the ct subcommands are described throughout the rest of this section.
The new command
There is some minimal boilerplate that is the same for every new project. The
new command was created to allow you to get started quickly without worrying
about creating that boilerplate yourself.
The new command is used like this:
ct new <path>
The <path> argument is where the directory for the new project will be
created.
Running this command creates the following directory structure:
<path>
├── first-step
│   ├── Cargo.toml
│   ├── first-step.md
│   ├── .gitignore
│   └── src
│       └── main.rs
├── .gitignore
├── intro.md
├── SUMMARY.md
└── tour.toml
- The
tour.tomlfile contains the configuration for this project. See Manifest Format for more information. - The
SUMMARY.mdfile is the table of contents of your project. See Table of Contents for more information. - The
.gitignorefile is generated because as part of your project's creation, we also initialize a git repository as well. This file ignores the folder in which the website is generated so that it does not accidentally get added to your version control system. You can configure which VCS we use (or disable initializing a VCS) with the--vcsoption.
The rest of the generated files are just to give you an idea of the various features of codetour.
- The
intro.mdfile results in codetour generating a Content-only Page - The
first-stepdirectory creates a page with both content and Attachments. The fact that this is a Rust project is just for demonstration purposes. You can use codetour with any language(s).
See Project Structure for more information about these files and how to structure your project.
--vcs
The --vcs option allows you to specify the version control system of the
created project. See ct new --help for more information about the version
control systems that are supported.
The import command
Codetour is designed to give you the ability to walk through the creation of a
project step-by-step. Creating a codetour project for each step of a project you
have already created elsewhere can be tedious. The import command attempts to
take advantage of version control information to generate every step for you.
Run the following command to generate a new project from a local or remote repository.
ct import <repo-url-or-path> [directory]
- The first argument is either a path to a local repository or the URL of a remote repository. This repository will be imported to create the new project.
- The second optional argument is a directory to use for the new project. This
is the same as the
<path>argument passed to the new command. If omitted, this will be chosen from the given repository URL or path.
--branch
The --branch (-b) option allows you to specify the particular branch of the
repository to select for importing. This is useful for when the content you want
to import is not the default branch of the repository.
--vcs
The --vcs option is the same as the --vcs option of the new
command. This will be used to determine the VCS of the created project. The VCS
of the provided repository is determined automatically from its URL or path.
Import Behaviour
Stability Note:
This command is considered unstable. That is, its behaviour and arguments may change in a future release. Since this command is only used once when creating a project, the impact of changing it should hopefully not be too severe for most users.
This page will always reflect the current usage information for the
importcommand in the latest release of codetour. You can also runct import --helpto see how to use the import command for the version you have installed.To participate in the discussions around this feature, see the
A-importlabel on GitHub.
The provided repository is cloned into a temporary directory before any other operation takes place. That is, if you provide a local path, no part of this import should impact that directory or change its state in any way.
Once a copy of the repository has been created, we check out the provided branch if it is specified.
At this point, we know that we have a repository ready to go, so we can start to
create the project. The directory for the project is created and a tour.toml
file is generated in that directory.
We then start to walk the entire commit graph of that repository branch one revision at a time. This begins at the start of the project and continues to its latest revision.
For every revision, we create a new stepNN directory in the project directory.
NN is the number of the current step (e.g. step01, step02, etc.). The
entire state of the repository at that revision is then copied into that
directory. These files will be treated as the Attachments for that step.
After copying the step's attachments, we create a new content file stepNN.md
with the same name as the step directory. See Project Structure for more
information.
With each step, we record its directory name and after all steps have been
generated we create the Table of Contents file (SUMMARY.md).
Example
Suppose you have a project with the following commit log listed from the first commit to the latest commit:
1. 6d2184c Initial Rust project with assets
2. 65211b2 Starting with SDL2 example program
3. e5858df Restructured into traditional game loop
You run the command:
ct import https://github.com/your-user/example
This will generate a project with the structure:
example
├── step01
│   ├── ...entire repository at 6d2184c...
│   └── step01.md
├── step02
│   ├── ...entire repository at 65211b2...
│   └── step02.md
├── step03
│   ├── ...entire repository at e5858df...
│   └── step03.md
├── .gitignore
├── SUMMARY.md
└── tour.toml
Limitations
After importing your repository, you will have a functioning codetour project. That being said, there is probably a significant amount of work that you will need to do before you can actually start to write the content for each generated step.
To start, you will likely have to rename each step. That involves changing its directory name, content file name, and its listing in SUMMARY.md. You will also probably want to restructure the project since the numbered step directories are not very user friendly.
This is incredibly tedious work, but still at least a slight improvement over importing every step yourself.
There are some proposals about how to lift some of these limitations from the
importing process. To participate in the discussions around this feature, see
the A-import label on GitHub.
The build command
The build command will generate a static website from the files in your
project.
ct build
This command will try to parse the Manifest File (tour.toml). Using that, it
will load the Table of Contents (SUMMARY.md) and start to generate each page
of your project.
By default, the generated website is stored in a new _site folder. The folder
starts with an underscore (_) to avoid conflicting with any other folders you
may be using for your project.
Stability Note:
Currently, the generated website does not maintain the same directory structure as its source files. That is, each page listed in
SUMMARY.mdis generated into an HTML file at the root of the generated project even if it resides in a subdirectory of the project.Downloadable Attachments related to a particular page are put into a subdirectory specific to that page to avoid any conflicts, but the pages themselves are all put flatly into the root directory of the generated project.
This may change one day since codetour is still a relatively young project. That being said, you can avoid having your project break too much by following the conventions in the Project Structure section and avoiding nesting steps in directories.
Codetour is still developing, so contributions and discussion around how the generated website should be structured are welcome!
--manifest-path
The --manifest-path option allows you to specify a full path to the
configuration file you want codetour to use. This file does not need to be named
tour.toml.
The path provided with this option should not be the directory of the configuration file you want codetour to use. It should be the full path to the file itself.
The command will still be run as if it was invoked in the directory of the
provided configuration file. This option is just in case you are either not in
the directory of your project or if you need to name the configuration file
something other than tour.toml.
The clean command
The clean command is used to delete the generated website and any other build
artifacts.
ct clean
--manifest-path
The --manifest-path option allows you to specify a full path to the
configuration file you want codetour to use. This file does not need to be named
tour.toml.
The path provided with this option should not be the directory of the configuration file you want codetour to use. It should be the full path to the file itself.
The command will still be run as if it was invoked in the directory of the
provided configuration file. This option is just in case you are either not in
the directory of your project or if you need to name the configuration file
something other than tour.toml.
The completions command
ct supports generating completion scripts for Bash, Fish, Zsh, and PowerShell.
See ct help completions for full details, but the gist is as simple as using
one of the following:
# Bash
$ ct completions bash > /etc/bash_completion.d/ct.bash-completion

# Bash (macOS/Homebrew)
$ ct completions bash > $(brew --prefix)/etc/bash_completion.d/ct.bash-completion

# Fish
$ ct completions fish > ~/.config/fish/completions/ct.fish

# Zsh
$ ct completions zsh > ~/.zfunc/_ct

# PowerShell v5.0+
$ ct completions powershell >> $PROFILE.CurrentUserCurrentHost
# or
$ ct completions powershell | Out-String | Invoke-Expression
Note: you may need to restart your shell in order for the changes to take effect.
For zsh, you must then add the following line in your ~/.zshrc before
compinit:
fpath+=~/.zfunc
Project Structure
In general, codetour attempts to favor convention over configuration. That means that while there is some initial setup, you should be able to use codetour without having to configure it all the time as long as you follow the conventions described throughout this documentation.
The first convention you should get familiar with is the structure of a codetour project:
<path>
├── creating-a-project
│   ├── Cargo.toml
│   ├── creating-a-project.md
│   ├── .gitignore
│   └── src
│       └── main.rs
├── adding-characters
│   ├── Cargo.toml
│   ├── adding-characters.md
│   ├── .gitignore
│   └── src
│       └── main.rs
│       └── character.rs
├── .gitignore
├── intro.md
├── SUMMARY.md
└── tour.toml
Both SUMMARY.md and tour.toml are by default expected to be at the root of
your project.
We're only using Rust files for demonstration purposes. The codetour tool is designed to work regardless of the language you're writing your project in.
The SUMMARY.md file represents the Table of Contents for your project and
helps codetour determine which files/directories to generate pages for. None of
the other files mean anything until they are explicitly listed in SUMMARY.md.
That being said, from this structure, you could infer that SUMMARY.md probably
lists creating-a-project and adding-characters as pages with Attachments
while intro.md is a Content-only Page.
The tour.toml file contains the configuration for your project. More on that
in the Manifest Format section.
Manifest Format - tour.toml
The tour.toml file is used by codetour to configure your project. Since
codetour favors convention over configuration, you should rarely have to add to
this file once you've setup your project.
This file is written in the TOML format. You should familiarize yourself with that if you aren't familiar with its syntax.
The following is a complete listing of all of codetour's options. Every option is optional unless it is specified otherwise. For optional options, the listed value is its default value.
[tour]
# Required. The title of the tour. Used in the titlebar at the top of the page.
title = "Your great project"
# The description of your project. Used in a <meta> tag.
# Use this space to describe what makes your project great!
description = ""
# A list of authors of this project.
# Example: ["Your Name <[email protected]>", "Other Name <[email protected]>"]
authors = []

[build]
# The path to the SUMMARY.md file used to build the table of contents
summary_path = "SUMMARY.md"
# The path where the built website will be placed
build_dir = "_site"
# The path relative to the build directory where static files
# (js, css, etc.) will be placed
static_dir = "static"
# Extra paths to copy into the build directory
# Unstable. See: https://github.com/sunjay/codetour/issues/23
include = []

[js]
# Filename of the codetour JavaScript file to be generated in the static directory
filename = "codetour.js"

[css]
# Filename of the codetour CSS file to be generated in the static directory
filename = "codetour.css"
# Output style for the generated CSS
# Either "compressed" or "expanded"
output_style = "compressed"
Table of Contents - SUMMARY.md
- index.html redirects to the first step
Content-only Pages
- Screenshot
- Page content moves from the sidebar to the main panel
- Table of Contents always visible
Attachments
- Screenshot
- Content is in sidebar
- Meant to be used to explain the code shown in the main panel on the right
- Table of contents is accessible from the toggle above the page content
Ignoring Files
- .gitignore'd files are ignored by default
- Makes it easy to run your code since built files are ignored
- .tourignore can be used to ignore additional files
Features
- Picture of the interface with arrows and explanations of the various parts
- Basically a tour of the tour website lol :joy:
- Components to go over:
- Table of Contents toggle
- Previous / Next step buttons
- Take you to the next step that has an associated page (no dead ends even if you haven't finished writing)
- File tree
- colors of changed files
- download files that cannot be viewed
- File tabs
- opening / closing
- changed lines are highlighted
- Diff view button
- Runnable - you can run your code normally
Markdown Syntax
- link to basic markdown tutorial
- supported markdown extensions
- link to other page about file links + other markdown features added in codetour
- syntax highlighting of fenced code blocks
- checklists
- images, gifs, embedded YouTube videos
- Example YouTube video: https://youtu.be/o_4EX4dPppA
Front Matter
- This is TOML - link to TOML GitHub
- No whitespace around
---